Overview
Document Library Power Pack’s client management system turns your WordPress site into a private, per-client document portal. You can create individual logins for each client, organise their files into their own private category tree, deliver documents securely, and get notified the moment a client opens and acknowledges a file.
Client management is an optional feature. Once it is enabled (DLP Power Pack → Power Pack Settings → Enable Client Management), a new suite of admin pages appears under the DLP Power Pack menu.
The Client Role
Every client is a standard WordPress user assigned the custom Document Library Client role. This role has only the read capability — clients cannot create posts, access the WordPress dashboard, or see anything outside their own document area. The role is created automatically when the plugin activates and removed cleanly on uninstall.
Creating Clients
Single Client
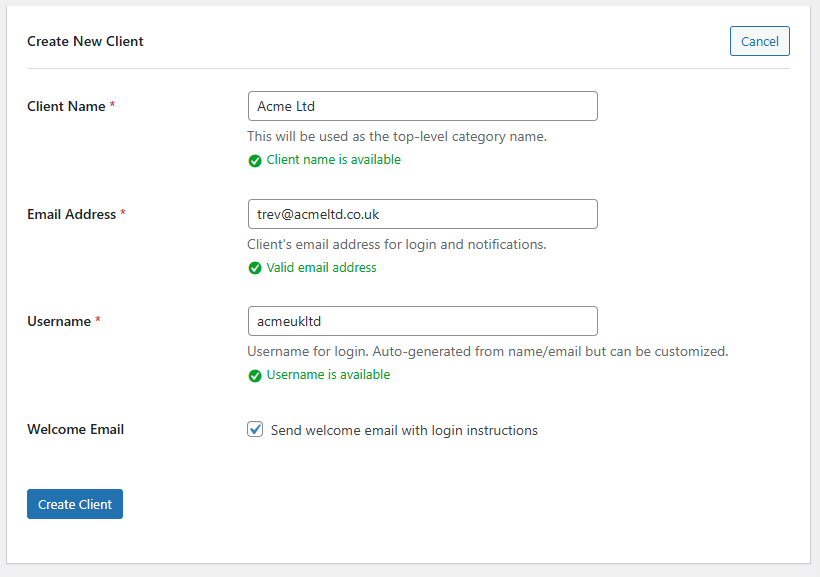
Navigate to DLP Power Pack → Client Management and complete the creation form:
| Field | Notes |
|---|---|
| Client Name | Used as the parent category name and display name |
| Required; used for all notification emails | |
| Username | Auto-generated from email if left blank; availability is checked live via AJAX |
| Send Welcome Email | Tick to email login instructions and a password-reset link immediately |
When you click Create Client, the plugin:
- Inserts a new WordPress user with a randomly generated 20-character password.
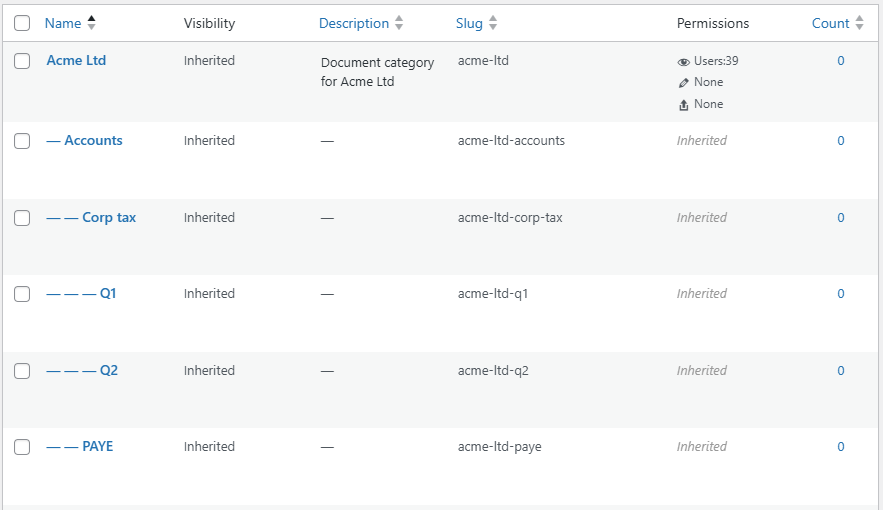
- Creates a parent category named after the client.
- Creates child categories from the category template you defined under Client Settings (indented lines in the template textarea become sub-categories; 2 spaces or 1 tab equals one depth level).
- Stores the client’s user ID in the parent category’s term meta (
_dlp_assigned_user_id) so the system always knows which category belongs to which person. - Sets category-level permissions so only that specific user can view the category (
dlp_view_permission = users:<user_id>), while upload and edit permissions are set tonone— clients can only read, not add or change files. - Optionally sends the welcome email.
The entire operation is wrapped in a transaction-like rollback: if any step fails, the plugin cleans up the user and any partially created categories so you are never left with orphaned records.
Bulk Import via CSV
For onboarding many clients at once, use the CSV Import section on the same page.
Upload a .csv file with up to 500 rows. Accepted columns:
name, email, username
username is optional — the plugin auto-generates one if the column is blank or the field is omitted. Each row is validated independently, so a bad row does not block the rest. After processing, a summary transient shows how many clients were created successfully and which rows (if any) failed and why.
The Client Manager Table
The Client Management page lists every user with the Document Library Client role in a sortable, paginated table (10 per page). Each row shows:
- Name, Email, Username
- Registered date
- Documents — total documents in the client’s categories
- Pending Ack. — documents sent for acknowledgment that the client has not yet confirmed (displayed as a red badge when greater than zero)
- Last Activity — pulled from the activity log; shows when the client last logged in, downloaded, or acknowledged a document
- Actions — Edit User (WP user profile), Upload Document (pre-filtered to the client’s category), Resend (resend any pending notifications), Activity Log

Protected Downloads
How Files Are Protected
When you upload a document to a client’s category that has secure uploads enabled (either per-category or via the global setting), the file is physically stored outside the public web tree:
wp-content/uploads/dlp-protected/YYYY/MM/filename.extA .htaccess file in this directory contains Require all denied, which prevents Apache from serving any file directly. An empty index.php provides an extra safety net. Nginx users are shown an admin notice with the equivalent configuration directive:
location /wp-content/uploads/dlp-protected/ { deny all; }The plugin creates and maintains this directory and its protection files automatically on every admin_init.
Serving Protected Files
No file in the protected folder is ever served by the web server directly. Instead, all download links throughout the site are transparently rewritten to a PHP proxy URL:
/?dlp_download=<document_id>This rewriting is handled by a filter on wp_get_attachment_url — so whether Document Library Pro generates the link, or it appears in post meta, or a shortcode outputs it, the final URL the browser receives is always the proxy.
When a visitor follows that URL, the plugin’s DLP_Secure_Download class intercepts the request at the very start of the WordPress bootstrap (init at priority 1) and runs the following checks in order:
- Is the user logged in? If not, they are redirected to the login page with a return URL so they land on their document after authenticating.
- Does the document exist and is it published?
- Does the user have permission to view the document’s category? This delegates to
DLP_Category_Permissions_Filters::user_can_view_document(), which reads thedlp_view_permissionterm meta on every category the document belongs to.
Only if all three checks pass does the plugin read the file from disk and stream it to the browser in 256 KB chunks — avoiding PHP memory limits on large files. Appropriate Content-Type, Content-Disposition, and Content-Length headers are set automatically. The X-Content-Type-Options: nosniff security header is also included.
Download activity is logged in the activity table for any user with the client role.
Moving Existing Files to the Protected Folder
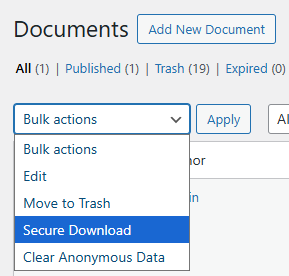
If documents were uploaded before secure storage was enabled, you can move them in bulk:
- Go to Documents → All Documents in the WordPress admin.
- Select the documents to protect.
- Choose Secure Download from the bulk actions menu and click Apply.
The plugin moves each file to the protected folder, updates WordPress attachment metadata, and automatically switches the document’s link type to the proxy URL. A results notice summarises how many files were moved successfully.
Document Approval Tracking
The approval workflow lets you send a document to a specific client, require them to formally acknowledge receipt, and track whether they have done so.
Step 1 — Sending a Document
From the document list or from an individual client’s row in the Client Manager table, click Upload Document or use the Notify action. The plugin:
- Generates a cryptographically-secure token and inserts it into the
wp_dlp_approval_tokensdatabase table, recording:- The token string
- The document ID
- The client’s user ID
- Created and expiry timestamps (default: 7 days; configurable under Client Settings)
- Saves
_dlp_notified_user_idpost meta on the document so the system knows which user is expected to acknowledge it. - Sends a notification email to the client containing:
- Document title, filename, categories, tags, and upload date
- A personalised approval link (the token is embedded in the URL):
/dlp-approve-document/?token=<TOKEN>&doc_id=<ID> - A direct download link (also proxied through the secure download handler)
- Logs a
notifiedevent in the activity table.
Step 2 — Client Acknowledges
When the client clicks the approval link in their email:
- WordPress routes the request via a custom rewrite rule (
dlp-approve-document) to theDLP_Client_Approvalclass. - If the client is not logged in, they are redirected to the login page and brought back after authenticating.
- The plugin validates the token:
- Looks it up in
wp_dlp_approval_tokensby token string. - Confirms it has not expired.
- Confirms the
document_idin the URL matches the token record.
- Looks it up in
- It verifies user authorisation — the currently-logged-in user’s ID must match the
_dlp_notified_user_idmeta on the document. This prevents one client from approving a document meant for another. - If the token has already been used (client clicked the link twice), the plugin skips re-approval and redirects straight to the download.
- If everything passes,
approve_document()runs:- Marks the token as used in the database with the current timestamp.
- Writes
_dlp_approved_by(user ID) and_dlp_approved_at(datetime) to the document’s post meta. - Logs an
acknowledgedevent in the activity table. - Sends an admin confirmation email listing the client’s name, the document, and the approval date with quick-action links (View, Download, Edit, View Client Profile).
- The client is immediately redirected to the secure download proxy so the file downloads automatically — a seamless experience where acknowledging and downloading happen in one click.
Step 3 — Reminders
A WP-Cron job (dlp_reminder_check) runs daily. It finds every document that has a _dlp_notified_user_id set but no _dlp_approved_at, and where the notification was sent more than N days ago (configured via dlp_reminder_days, default: 3). For each one it:
- Generates a fresh token (so the original link is not reused).
- Sends a reminder email to the client with the same content as the notification email plus a highlighted “Reminder” notice box.
Admin Tracking — Acknowledgment Status Page
DLP Power Pack → Acknowledgment Status shows every document that has been sent for acknowledgment, with filter tabs for:
- All — complete list
- Pending — notified but not yet approved (yellow badge)
- Acknowledged — approved (green badge)
- Overdue — not approved after the configured reminder period (red badge)
Each row includes the document name, client name, sent date, and a Resend button that generates a fresh token and sends another notification immediately.
The Client Manager table also surfaces this data at a glance: the Pending Ack. column shows a red count badge for any client with outstanding documents.
Activity Log
Every significant event for a client user is recorded in the wp_dlp_client_activity database table:
| Event | Trigger |
|---|---|
login | Client logs in to WordPress (wp_login hook) |
download | Client follows a /?dlp_download= proxy link |
acknowledged | Client approves a document via the approval endpoint |
notified | A notification email is sent to the client |
welcome | The welcome email is sent on account creation |
The table stores the user ID, event type, document ID (where applicable), IP address, and timestamp. IP detection supports CloudFlare (CF-Connecting-IP), load balancers (X-Forwarded-For, X-Real-IP), and direct connections (REMOTE_ADDR).
To view a client’s full log, click the Activity Log link in their row on the Client Manager page. The log is displayed in a standard WordPress admin table ordered most-recent first.
Email Configuration
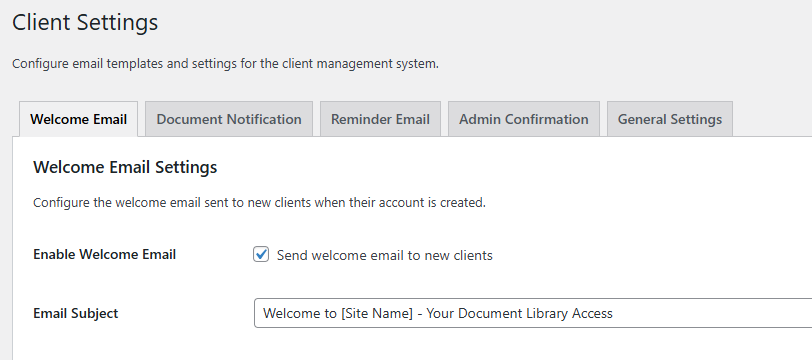
All four email types are configurable under DLP Power Pack → Client Settings:
| When sent | Template variables | |
|---|---|---|
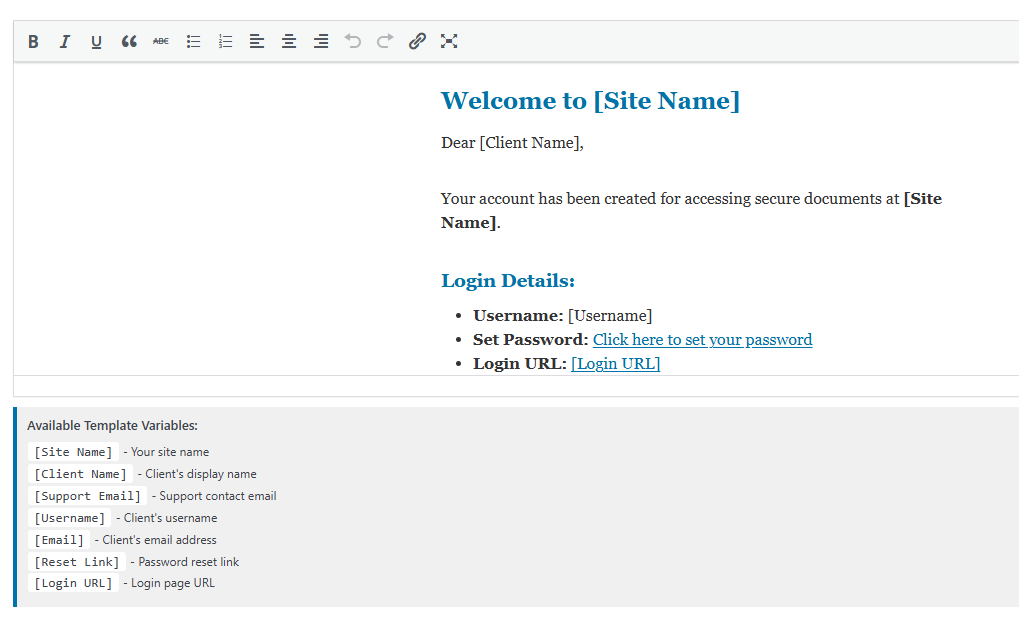
| Welcome | On client creation (if enabled) | [Site Name], [Client Name], [Username], [Email], [Reset Link], [Login URL], [Support Email] |
| Document Notification | When a document is sent for acknowledgment | Document title, filename, categories, tags, upload date, [Approval Link], [Download Link] |
| Reminder | After N days without acknowledgment | Same as notification plus reminder notice |
| Admin Confirmation | When client acknowledges a document | Client details, document, approval date, admin quick links |
Each template is edited in a standard WordPress rich-text editor. A helper box on each tab lists the available variables for that email type.