
Plugin version: 1.0.0 Requires: WordPress 6.0+, Kadence Blocks (Advanced Forms)
Table of Contents
- What this plugin does
- Requirements
- Installation
- Quick-start guide
- Understanding routes and conditions
- AND vs OR logic explained
- Rule priority and ordering
- How routing is applied
- Troubleshooting
1. What this plugin does
Kadence Form Router lets you send a form’s confirmation email to a different recipient depending on what a visitor selects in the form. Instead of every submission going to one fixed address, you can define rules — called routes — that inspect the submitted field values and redirect the email accordingly.
Example: A contact form has a “Department” dropdown. Submissions selecting Sales go to sales@example.com, submissions selecting Support go to support@example.com, and everything else uses the form’s default recipient.
Version 3 includes:
- Block editor sidebar panel — routing rules are configured directly inside the Kadence form editor, with no separate settings page to navigate to
- Multi-condition routes — a route can require several field values to match before it fires
- AND / OR logic — choose whether all conditions must match (AND) or any one of them is enough (OR)
- Rule ordering — rules are numbered and can be reordered using up/down arrows to control which takes priority
2. Requirements
| Requirement | Minimum version |
|---|---|
| WordPress | 6.0 |
| PHP | 8.0 |
| Kadence Blocks | Any version that includes Advanced Forms |
The plugin routes the wp_mail call that Kadence fires when a form is submitted. It does not affect other emails sent by your site.
3. Installation
- Upload the
kadence-form-routerfolder to/wp-content/plugins/. - In the WordPress admin, go to Plugins → Installed Plugins and activate Kadence Form Router.
- Open any Kadence form in the block editor — the Email Routing panel will appear in the sidebar.
4. Quick-start guide
Routing is configured directly inside the Kadence form editor. There is no separate settings page.
Step 1 — Open the form in the block editor
Go to Kadence Forms in the WordPress admin and edit the form you want to configure routing for. In the block editor, look for the Email Routing panel in the right-hand sidebar under the Form tab (you may need to scroll down).
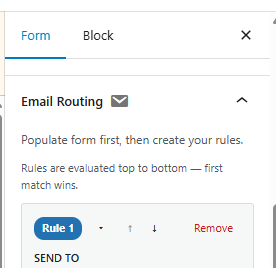
The panel automatically loads the select and radio fields from the current form. If it shows a spinner briefly, it is fetching the field list in the background.
Step 2 — Add a rule
Click + Add Rule. Each rule represents one possible email destination and is numbered in the order it will be evaluated (Rule 1, Rule 2, etc.).
- Send To — the email address that will receive the submission when this rule matches.
- Match — choose ALL conditions (AND) or ANY condition (OR).
Step 3 — Add conditions
Each rule starts with one condition row. A condition is a field/value pair:
- Use the first dropdown to select which form field to inspect.
- Use the second dropdown to select the value that field must have for this rule to match.
Click + Add Condition to add more conditions to the same rule.
Step 4 — Add more rules (optional)
Click + Add Rule again to add another destination with its own conditions. Rules are evaluated from top to bottom — see Rule priority and ordering for how to change the order.
Step 5 — Save
Click the Save or Update button in the block editor toolbar. Rules are saved as part of the form post and will persist across page reloads.
5. Understanding routes and conditions
Routes (rules)
A route is a rule that says: “If the submission meets these conditions, send the email to this address.”
Each route has:
- A rule number — shown as a blue badge (Rule 1, Rule 2, …) indicating its evaluation priority
- A recipient email address
- A logic mode (AND or OR)
- One or more conditions
Conditions
A condition checks whether a specific field in the form was submitted with a specific value.
| Condition part | What it means |
|---|---|
| Field | Which select or radio field to look at |
| Value | The exact option value that field must contain |
Note:
selectandradiofield types are available for conditions, because they have a fixed, known set of values. Text fields and similar inputs support “contains” conditions only.
Field values vs labels
Kadence stores a separate label (what the visitor sees) and value (what is submitted). The plugin matches against the value. When you build a condition, the value dropdown shows labels for readability but stores and matches on the underlying value.
6. AND vs OR logic explained
The Match selector on each route controls how multiple conditions are combined.
ALL conditions (AND)
Every condition in the route must be satisfied for the route to match. Use this when a recipient should only receive emails from a very specific combination of selections.
Example:
| Field | Value |
|---|---|
| Department | Sales |
| Region | United Kingdom |
Logic: AND
This route fires only when a visitor selects both Sales and United Kingdom. A visitor who selects Sales and Europe would not match this route.
ANY condition (OR)
At least one condition must be satisfied. Use this when several different selections should all go to the same recipient.
Example:
| Field | Value |
|---|---|
| Topic | Billing |
| Topic | Refunds |
| Topic | Payments |
Logic: OR
This route fires when a visitor selects Billing, Refunds, or Payments — any one of them is sufficient.
7. Rule priority and ordering
Rules are evaluated in the order they appear in the panel, from top to bottom. The order is shown clearly in two ways:
- A “Rules are evaluated top to bottom — first match wins” notice appears above the rule list as a reminder (visible when two or more rules exist).
- Each rule has a numbered badge (Rule 1, Rule 2, etc.) that updates automatically whenever rules are reordered.
Reordering rules
Use the ↑ and ↓ arrow buttons in each rule header to move it up or down in the list. The ↑ button is disabled on the first rule; the ↓ button is disabled on the last.
When does order matter?
Order matters when a submission could match more than one rule. For example, if you have a broad OR rule that catches several topics and a more specific AND rule targeting one of those same topics, the specific rule should appear first — otherwise the broad rule will match first and the specific one will never fire.
A common pattern is to put your most specific rules at the top and your broadest fallback rules at the bottom.
8. How routing is applied
When a Kadence Advanced Form is submitted:
- The plugin checks whether the submitted form has any routing rules configured.
- If it does, the plugin walks through the rules in the order they were saved, from top to bottom.
- For each rule, it evaluates the conditions against the submitted field values using the configured AND/OR logic.
- The first rule that matches is used. The plugin sets that rule’s email address as the recipient and stops checking further rules.
- If no rule matches, the form’s own default recipient is used — the plugin does nothing.
The email override is applied via a self-removing wp_mail filter scoped to the single send triggered by that submission, so it cannot affect other emails on the same request.
9. Troubleshooting
The Email Routing panel does not appear in the sidebar
- Confirm the plugin is active under Plugins → Installed Plugins.
- The panel only appears when editing a Kadence form post (
kadence_formpost type). It will not appear on pages, posts, or other post types. - Try a hard refresh of the editor page (Ctrl+Shift+R / Cmd+Shift+R) to clear any cached scripts.
The panel shows “No select or radio fields found”
- Only
selectandradiofield types appear. If your form only has text or other field types, no fields will be listed. - The field must have at least one option configured in Kadence. Fields with no options are excluded.
- Save the form and reload the editor to trigger a fresh field load.
The email is not being rerouted
- Confirm the plugin is active under Plugins → Installed Plugins.
- Verify that the field name in your condition matches exactly. If your form field has a custom input name set in Kadence, that is the name used — not the label.
- Confirm the submitted value matches exactly. Values are case-sensitive.
- Check that Send To contains a valid email address. Invalid addresses are stripped by WordPress’s
sanitize_email()on save.
After saving, my rules have disappeared
- A rule is only saved if it has at least one valid condition (field and value both set) and a valid email address. Incomplete rows are discarded on save.
- Make sure you clicked the Save / Update button in the block editor toolbar — closing the browser tab without saving will discard any changes.
The wrong recipient is receiving emails
- Rules are evaluated top-to-bottom and the first match wins. Check the numbered badges on your rules — if a broader rule appears before a more specific one, it may be matching first.
- Use the ↑ ↓ arrows to move a more specific rule above a broader one.
- Use AND logic when you need a precise combination of field values; use OR when any one value should suffice.
I updated the form fields in Kadence but the dropdowns still show old values
- Field data is loaded when the editor opens. Save your field changes in Kadence, then close and reopen the form editor to reload the latest field list.
- If scripts have been cached by your browser, do a hard refresh (Ctrl+Shift+R / Cmd+Shift+R).