
Fill in the Blanks 1.1 – Smarter filling, better automation, and tighter profile management
Version 1.0 made form testing fast. Version 1.1 makes it more resilient and more powerful – filling forms that change their field IDs, smarter random value generation, scheduled automation, two-way WordPress sync, and a set of profile organisation tools that keep your library manageable as it grows.
Label-Based field matching
Custom field IDs on some platforms – especially WooCommerce and page builders – can change between sessions or when new fields are added. A profile captured on Monday might fail to fill a field on Friday because the underlying ID is now different.
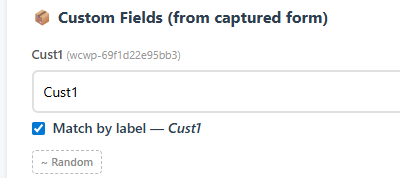
Label-based matching solves this. When you capture a form, the extension now also records the visible label text for each field alongside the field ID. In the profile editor, custom fields display their human-readable label – so instead of seeing wcwp-69f1d22e95bb4, you see Cust1 (wcwp-69f1d22e95bb4).
Each custom field has a new Match by label toggle. Enable it and the extension will find that field by its label text at fill time, not its ID. If the platform regenerates the field ID tomorrow, the fill still works – as long as the label stays the same.
This is particularly useful for:
- WooCommerce custom checkout fields where the ID includes a hash
- Page builder forms that regenerate field identifiers on positions
- Staging environments where field IDs differ from production
Improved randomisation workflow
Building a pattern template for a random value used to mean remembering the exact token syntax and typing it manually. Two improvements make this faster.
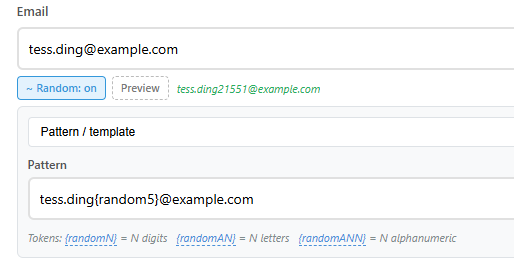
Auto-populate on switch: When you switch a field to the Pattern / template type, any existing value in the field is automatically copied into the pattern input as a starting point. If the email field already has test@example.com, that becomes your template to build from – add {random5} before the @ and you’re done.
Click-to-insert tokens: The token reference below the pattern input – {randomN}, {randomAN}, {randomANN} – are now clickable links. Click one and it’s inserted at the current cursor position in the pattern input. If your cursor is in the middle of a value, the token is inserted there. If you click from outside the input, it appends to the end. Chain multiple clicks to build up complex patterns without typing a single brace.
Preview visibility: The Preview button now only appears when there’s actually something to preview. For number and date types it shows immediately (they always have a valid default range). For list and template types it waits until you’ve entered at least one value or pattern – so you never see a useless “(empty)” result.
Scheduled sequence runs (Experimental)
Sequences let you automate multi-step form flows. Now you can set a date and time for a sequence to run automatically – no need to be at your desk.
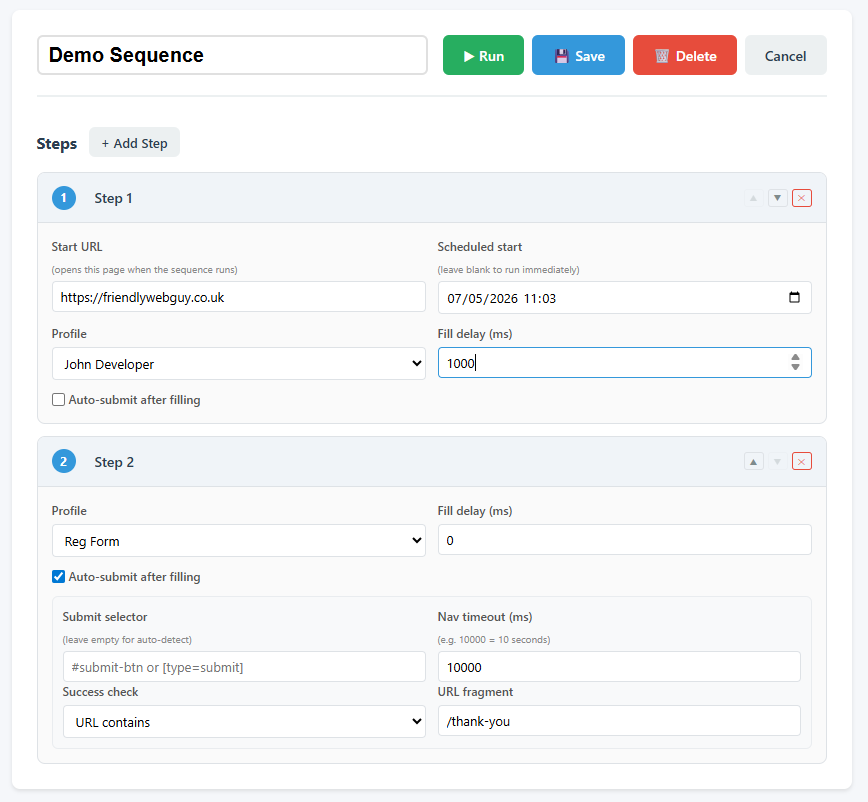
The first step of any sequence now has a Scheduled start field – a native date and time picker. Set it to 9:30 tomorrow morning and the extension will open the start URL, fill the form, and work through every step automatically when that time arrives. Close your laptop. It’ll run anyway.
The scheduled start survives browser restarts. Chrome’s alarm system handles the timing, and the pending run is persisted to storage – so even if the browser shuts down and restarts before the scheduled time, the sequence will still fire.
If you leave the scheduled start blank, sequences behave exactly as before and run immediately when you click Run.
Start URL on step one
Every sequence can now define a Start URL on its first step. When you hit Run, the extension navigates directly to that URL – no need to already be on the right page first. It waits for the page to fully load, then begins filling.
This means a sequence is now fully self-contained. Share it with a colleague, import it on a different machine, and it just works – the starting point is baked in.
WordPress sync for profiles & sequences
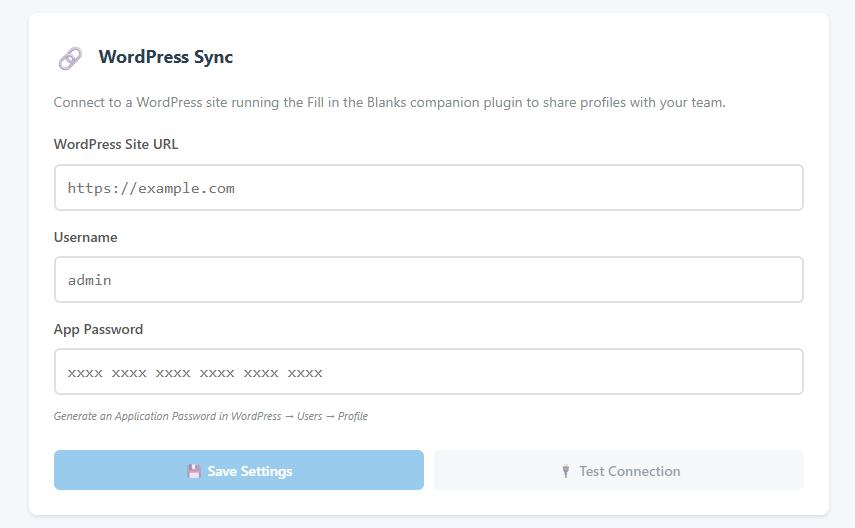
Version 1.1 introduces WordPress sync for both profiles and sequences.
Turn on Sync this sequence to WordPress in the sequence editor and it will be included in the next push to your WordPress site. From there it can be distributed to other team members or managed via the WordPress admin.
Pulling from WordPress is always manual and intentional – sequences that arrive from the server are disabled by default. You review them, enable what you need, and they stay under your control. No surprises.
Conflict resolution works the same way as profiles: if a sequence exists both locally and on the server with different steps, you choose which version to keep – or keep both.
The companion plugin is currently in development, if you are interested in using it for your own team please get in touch.
Profile organisation
Tag your profiles
With a handful of profiles, the sidebar is easy to scan. With thirty profiles across eight client projects, it becomes a scroll-through problem.
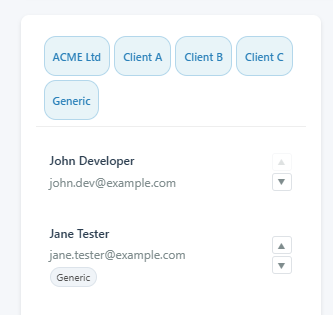
Every profile now has a Tags field. Type comma-separated labels – acme, checkout, woocommerce, staging – and they appear as clickable chips above the profile list. Click a tag to filter the list to only matching profiles. Click it again to clear the filter. Tags are also shown as small chips on each profile item so you can see at a glance what a profile is for without opening it.
Pin a profile to a URL
URL matching already auto-selects the most relevant profile when you land on a page (based on Captured forms). Until now, manually created profiles had no way to be pinned to a URL.
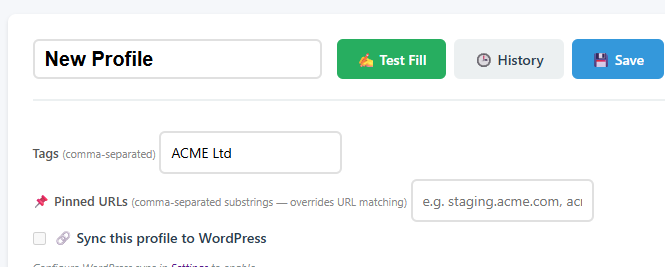
Pinned URLs are a hard override. Add one or more URL substrings to a profile’s Pinned URLs field (e.g. staging.acme.com or acme.com/checkout) and that profile becomes the definitive choice for any URL that matches. No cycling, no ambiguity. In the popup, pinned profiles show a 📌 badge. The keyboard shortcut respects pinning too. Pinned URLs is only shown when the profile was created by hand.
Search in the popup
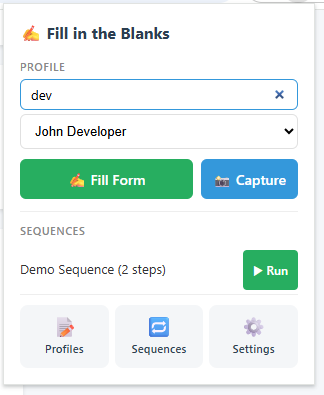
The profile dropdown in the popup now has a search box above it. Start typing a client name, domain, or any part of a profile name and the list filters instantly. The first match is automatically selected so you can type a few letters and hit Fill Form without touching the mouse.
Smarter import
Importing a JSON profile file now checks for two kinds of duplicates separately.
Same ID: A profile with the same internal ID already exists. You’re prompted to overwrite or skip — same as before.
Same name, different ID: A profile with the same name exists but was exported from a different install. You’re asked whether to import as a second copy or skip. No more silent duplicates cluttering your list.
Export as HTML or CSV
Sometimes you need test data in a format a client or non-technical teammate can actually read. The export menu now has two new options:
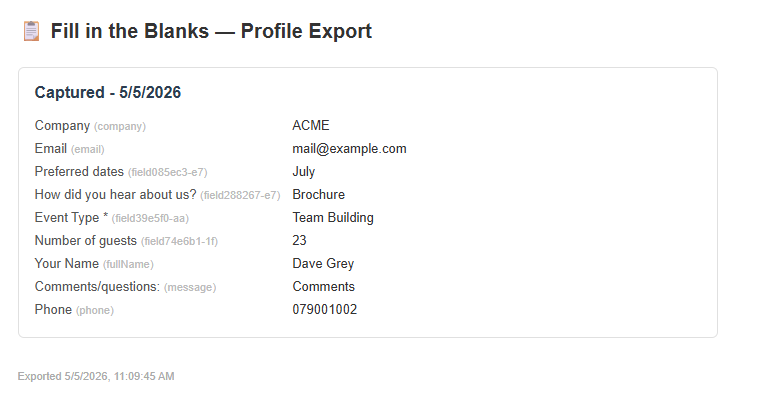
Export as HTML snapshot generates a clean, formatted HTML file with that profile’s fields laid out in a table. Drop it in a handoff document, email it, or print it. No extension required to read it.
Export as CSV generates a spreadsheet-compatible file with profiles as rows and field names as columns. Open it in Excel or Google Sheets, share it with a client, or use it as a reference during UAT.
Unsaved changes protection
If you open a profile or sequence for editing and then try to navigate to a different tab — Profiles vs Sequences — the extension now asks before you go. One confirmation prompt, no lost work.
It knows the difference between a genuine navigation away and an internal save or cancel — so clicking Save or Cancel doesn’t trigger the prompt. Only leaving with changes still pending does.
More new features
Run sequences directly from the popup
Saved sequences appear in the popup with a ▶ Run button next to it. One click starts it on whatever tab is active – no navigation, no hunting through the options page.
The sequences section only appears when you have sequences saved, so the popup stays clean when you don’t use them.
Randomisation preview
Randomisation rules let you configure fields to generate random values on every fill – number ranges, date ranges, pattern templates, pick-from-lists.
There’s now a Preview button next to every randomisation toggle. Click it while the rule panel is open and you’ll see a live sample value – right there in the editor, before saving anything. Click it again for a different sample. Iterate until the rule is right, then save.
Profile version history
Save over a working profile by mistake and it used to be gone. Now every save records the previous state automatically, keeping the last ten versions per profile.
The new 🕒 History button in the profile editor opens a side drawer listing all saved versions with timestamps and a summary of the field values at that point. Each entry has a Restore button. Restoring saves your current state as a new history entry first – so restoring to an old version is itself undoable.
Right-Click to fill a single field (Experimental)
Sometimes a form is mostly correct and you only need to fill one field. Or you want to drop a specific value into a field without affecting anything else on the page.
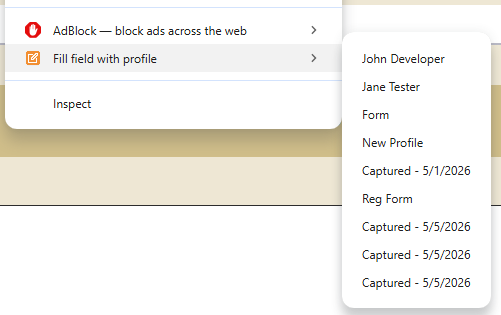
Right-click any text input in your browser and you’ll find a new Fill field with profile option. The submenu lists all your profiles. Select one and the extension fills that single focused field using the matching value from the profile – first name, email, address, or whatever the field is. Nothing else on the page changes.
The submenu updates automatically whenever you add or rename a profile, so it’s always current.
WordPress auto-sync on schedule (Experimental)
The Settings page now has an Auto-Sync Schedule section under WordPress Sync. Enable it, set an interval in hours (default is 24), and the extension takes it from there. Every N hours it pushes all profiles and sequences marked for sync to your WordPress site automatically, in the background, whether the browser popup is open or not.
A Last synced timestamp updates in the settings panel each time a sync completes so you always know when the server was last updated. The schedule survives browser restarts — Chrome’s alarm system re-registers it on startup.
Why these features matter
Every one of these came from real friction:
- Label-based matching means profiles survive platform updates that regenerate field IDs – common on WooCommerce and page builder forms.
- Click-to-insert tokens and auto-populate mean building a random pattern template takes seconds instead of looking up syntax and typing it by hand.
- Scheduled runs mean you can set up a test flow to run at 3am before a client demo and check the results in the morning – without babysitting it.
- Start URLs mean sequences are portable. No more “open the right page first” instructions.
- WordPress sync means your whole automation library – profiles and sequences – lives in one place and can be shared across a team without manual file passing.
- Tags and pinning mean as your profile library grows, it stays navigable. You stop spending time finding the right profile and start spending it on the actual work.
- HTML and CSV export closes the loop with clients. Your test data becomes a deliverable.
- Sequence run from popup shaves several clicks off the most common automation workflow.
- Randomisation preview closes the feedback loop when configuring rules — no more test fills just to check the output.
- Version history makes profiles safe to experiment with. Iterate freely; restore anything.
- Context menu fill adds a surgical option for when a full-page fill would do too much.
- Auto-sync eliminates the “forgot to push before the demo” problem entirely.
Getting started with the new features
Label-based matching: Capture a form as normal – label text is recorded automatically. Open the profile, scroll to the Custom Fields section, and tick Match by label on any field where the ID might change. Save. From that point on the extension will match that field by its label at fill time.
Random pattern templates: Open a profile, expand the ~ Random toggle on any field, and choose Pattern / template. If the field has a value it will be pre-filled as your starting pattern. Click any of the token links below the input — {randomN}, {randomAN}, {randomANN} – to insert them at the cursor position. Click Preview (appears once your pattern has content) to check the output.
Scheduled sequences: Open Sequences, edit any sequence, and set the Scheduled start field on step one. Click Run to schedule it – the run log will confirm the scheduled time. The sequence will fire automatically.
WordPress sync for sequences: Make sure your WordPress sync settings are configured in Settings first (same credentials as profile sync). Then open a sequence, tick Sync this sequence to WordPress, save, and use the 🔗 Sync dropdown to push.
Tags: Open any profile, scroll to the bottom of the editor, and type tags into the Tags field separated by commas. Save. The tag filter bar appears above the profile list automatically.
Pinned URLs: In the same section as Tags, add URL substrings to the Pinned URLs field. Save. The profile will become the definitive auto-fill choice on any URL containing those strings.
Run sequences from popup: Open the extension popup. Any saved sequences appear below the profile selector with a ▶ Run button. Click it to start the sequence on the active tab.
Randomisation preview: Open a profile, expand the ~ Random toggle on any field, choose a rule type, configure the parameters, then click Preview. A sample value appears next to the button. Click again for a different sample.
Version history: Open any profile and click the 🕒 History button in the editor toolbar. If the profile has been saved before, previous versions appear in the drawer. Click Restore on any entry to revert to that state.
Context menu fill: Right-click any text input on a web page. Select Fill field with profile and choose a profile from the submenu. Only that field is filled.
WordPress auto-sync: Go to Settings → WordPress Sync. Enter and save your credentials, then scroll to Auto-Sync Schedule. Check Enable scheduled auto-sync, set an interval, and click Save Schedule. The extension will sync automatically from that point on.